Install the software on macOS
The WhatPulse Professional software for macOS is simple to install. Check out the stop by step instructions below. If you'd like to install WhatPulse using the terminal, check out the last chapter on this page.
Installation steps
- Navigate to the Downloads page.
- Click the For Intel or For Apple Silicon button, depending on your Macs' architecture.
- Open the downloaded whatpulse-mac-latest.dmg file.
- Open the installer application.
- Click Open on the
an app downloaded from the internetmacOS warning and follow the prompts to complete the installation. - After you complete the installation, enable system permissions:
- Click Open Accessibility >> Open Sytem Preference.
- In the
Security and Privacywindow, from the left navigation pane, click Accessibility. - Click the lock icon and enter your system password.
- Select the WhatPulse checkbox on the Accessibility panel.
- From the left navigation pane, click Input Monitoring, and select the WhatPulse checkbox.
- Click the Quit & Reopen button to restart WhatPulse.
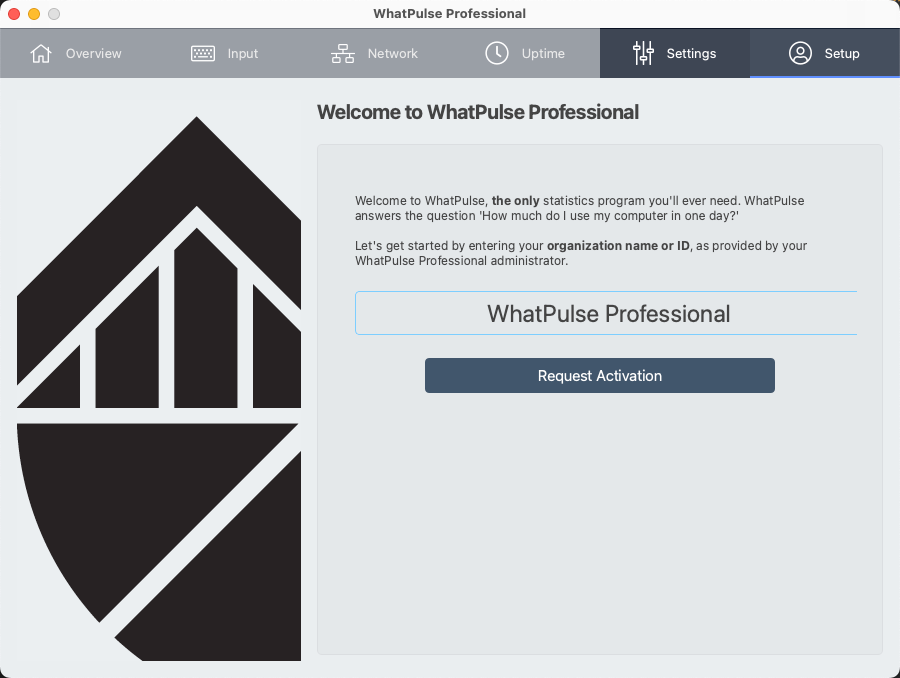
After you complete the installation and enable system permissions, you are greeted by the welcome screen. Now, you can enter your organization name or ID.

Activating Computers
By default, computers that have just gotten the software installed will be listed as Pending computers. WhatPulse Professional organization owners and admins can activate computers and link them to a user account. See this article that explains how to activate computers.
Installing via the Terminal
If you prefer to install WhatPulse on macOS using the installer instead of Homebrew, you can follow these steps:
- Navigate to the Downloads page.
- Click the Download for Mac button.
- Once the download is complete, locate the downloaded .dmg file in your Downloads folder or the designated download location.
- Double-click on the downloaded .dmg file to open and mount it.
- Open Terminal on your macOS. You can find it by going to Spotlight (press Cmd + Space) and typing "Terminal".
- In Terminal, run the following command, replacing VERSION with the appropriate version number:
/Volumes/WhatPulse\ VERSION/WhatPulse-VERSION-Installer.app/Contents/MacOS/WhatPulse-VERSION-Installer --root /Applications/WhatPulse --accept-messages --accept-licenses --confirm-command install
- Wait for the installation process to complete. Once finished, you can close Terminal.
- Optional: To have this WhatPulse installation automatically activate, create a file called
wp-pro-org-id.txtin the root directory (/Applications/WhatPulse/wp-pro-org-id.txt).- The contents of that text file has to contain your organization name or ID.
- This will allow the software to be installed fully autonomously, and it will automatically show up in the WhatPulse Professional dashboard as a pending computer.
- When WhatPulse starts, it will automatically connect to the WhatPulse Professional dashboard and show up as a pending computer. Check out this article on how to activate the new computer.
Congratulations! You have successfully installed WhatPulse on macOS using the installer.
When you are using remote deployment tools, you can download the latest WhatPulse installer to a central file repository from where the remote computers can retrieve it for their installation.
You can also override default settings (i.e. opening the window on startup) using a file called settings-overrides.ini. Find more details about settings-overrides.ini here.
Managing Privacy & Security Permissions
For WhatPulse Professional to record keyboard, mouse, and network activity on macOS, it must be granted a few system‑level permissions. This section walks through the normal setup flow and how to fix things if permissions stop working later.
Which Permissions Are Needed?
On macOS, WhatPulse relies on two privacy controls:
- Accessibility – lets WhatPulse observe keyboard and mouse input
- Input Monitoring – lets WhatPulse see which applications are in use
If either of these is missing or disabled, WhatPulse won’t be able to gather data.
Initial Permission Setup
When you first launch WhatPulse after installation, the app will automatically request the necessary permissions.
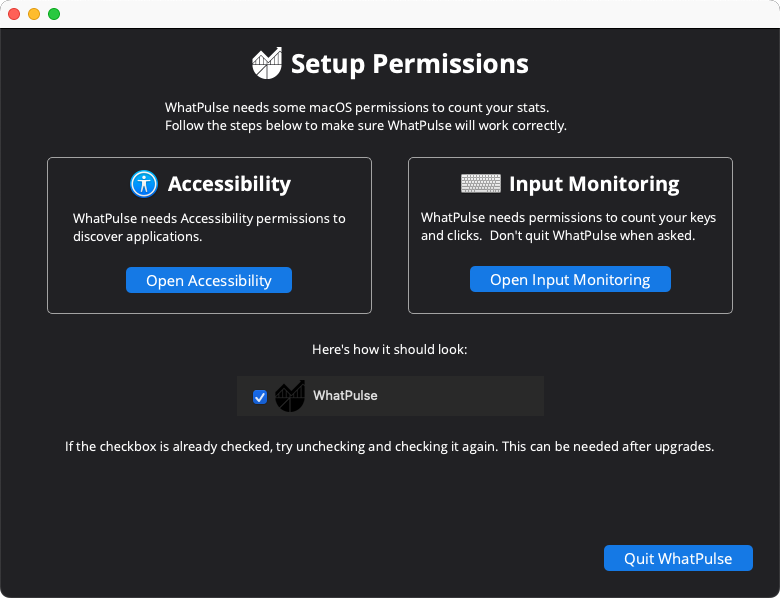
After starting WhatPulse, a permissions dialog appears:

Click Open Accessibility on the permissions dialog.
- This action opens the System Settings (or System Preferences on older macOS versions) directly to the Accessibility section.
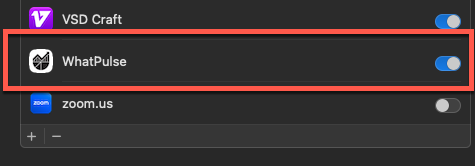
- Enable the checkbox next to WhatPulse to permissions:

- After granting the permission, you'll be asked for your password to confirm the change.
- Choose Later when prompted to restart Now or Later; you can restart WhatPulse in the next step.
When the permission is set, the WhatPulse window will show a green checkmark to indicate that's correct.
Next, click Open Input Monitoring on the WhatPulse app permission dialog.
- This action opens the System Settings (or System Preferences on older macOS versions) directly to the Input Monitoring section.
- Enable the checkbox next to WhatPulse to grant permissions
Click Restart WhatPulse in the WhatPulse app to restart with the new permissions.
After these steps, WhatPulse should be able to start tracking statistics as expected.
If Permissions Stop Working
macOS can occasionally drop or reset app permissions, for example after:
- A major macOS upgrade
- Security or system patches
- Reinstalling or updating WhatPulse
If WhatPulse continues to ask for permissions even though it's already listed in your System Settings, you'll need to remove and re-add the app to refresh the permissions.
Resetting WhatPulse Permissions
Follow these steps to reset WhatPulse's permissions:
Quit WhatPulse fully:
- Right-click the WhatPulse icon in the menu bar and select Quit.
Open macOS System Settings (macOS Ventura and later) or System Preferences (older macOS versions):
- Click the Apple menu in the top-left corner.
- Select System Settings or System Preferences.
Navigate to Privacy & Security:
- Click Privacy & Security in the sidebar.
Remove WhatPulse from Accessibility:
Click Accessibility.
Click the lock icon (if present) and enter your password to unlock.
Find WhatPulse in the list.
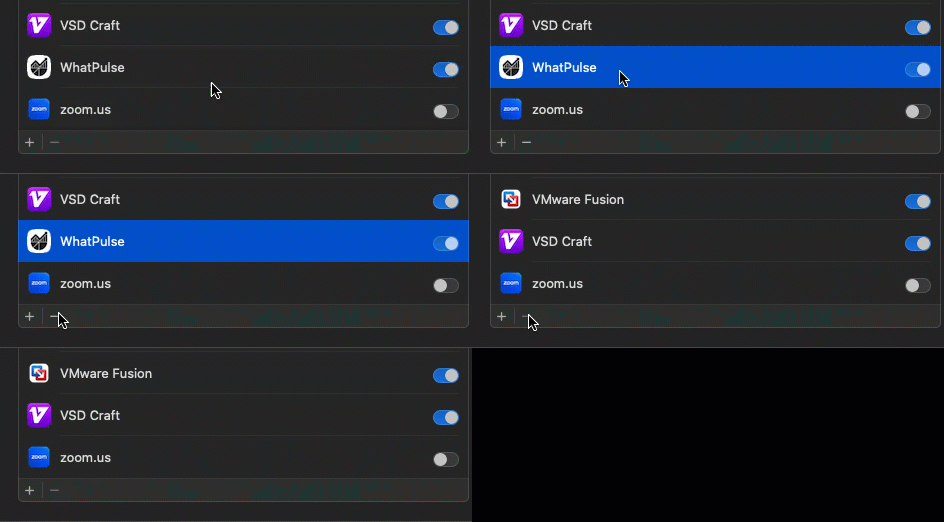
Hover over WhatPulse and click the minus (-) button or right-click and select Remove.
Confirm the removal, confirming with your password if prompted.

Remove WhatPulse from Input Monitoring:
- Click Input Monitoring from the Privacy & Security section.
- Find WhatPulse in the list.
- Hover over WhatPulse and click the minus (-) button or right-click and select Remove.
- Confirm the removal.
Start WhatPulse:
- Open WhatPulse from your Applications folder or Launchpad.
- The app will now request permissions again, as if it's the first time.
- Follow the Initial Permission Setup steps above to grant permissions.
After removing WhatPulse from the permission lists, you must completely quit and restart the application for macOS to recognize it as a new permission request. Simply closing the window is not enough.